Why Clearing Cache Matters in Windows 11
Over time, your Windows 11 system builds up all kinds of cached data — from system files and browser cache to app leftovers and DNS records. While this data can help speed up processes in the short term, letting it pile up too much can slow things down. If your computer feels sluggish or you’re running low on storage, it’s time to clear cache in Windows 11.
Table of Contents
- Why Clearing Cache Matters in Windows 11
- How to Delete Temporary Files in Windows 11
- How to Clear DNS and Browser Cache in Windows 11
- Clear DNS Cache
- Clear Browser Cache
- How to Clear System Cache in Windows 11
- Use Disk Cleanup Tool
- Optional: Remove Update Cache (Advanced)
- How to Remove App Cache in Windows 11
- Clear Cache from Microsoft Store Apps
- Clear Cache in Browsers (Edge, Chrome, Firefox)
- Clear Cache in Third-Party Apps
- Frequently Asked Questions (FAQ)
- 1. What’s the difference between temporary files and system cache?
- 2. Does clearing the cache delete my files or settings?
- 3. How often should I clear cache on Windows 11?
- 4. Can I automate cache clearing in Windows 11?
- 5. What’s the best way to clear DNS cache?
- 6. Will clearing cache help speed up my PC?
- 7. Is there a safe all-in-one tool to clear everything?
- 8. Can I undo cache clearing?
Cache files can include:
- Temporary system files used by Windows updates
- Cached images and files from web browsers
- App cache that’s no longer needed
- DNS cache storing outdated network info
While some cache helps your system run faster in certain situations, it can quickly become outdated or corrupted. Knowing how to delete temporary files in Windows 11 is one of the easiest ways to free up space and restore performance without deleting anything important.
In this guide, we’ll show you how to clear system cache in Windows, including DNS cache, browser data, Microsoft Store cache, and app cache — all with step-by-step instructions.
Let’s get started by looking at how you can check what kind of cached data is building up on your system.
How to Delete Temporary Files in Windows 11
One of the most effective ways to clear cache in Windows 11 is by deleting temporary files. These files accumulate over time from app usage, updates, and system processes, and they can take up gigabytes of space if left unchecked.
To delete temporary files safely using the built-in Settings app:
- Open Settings by pressing Win + I
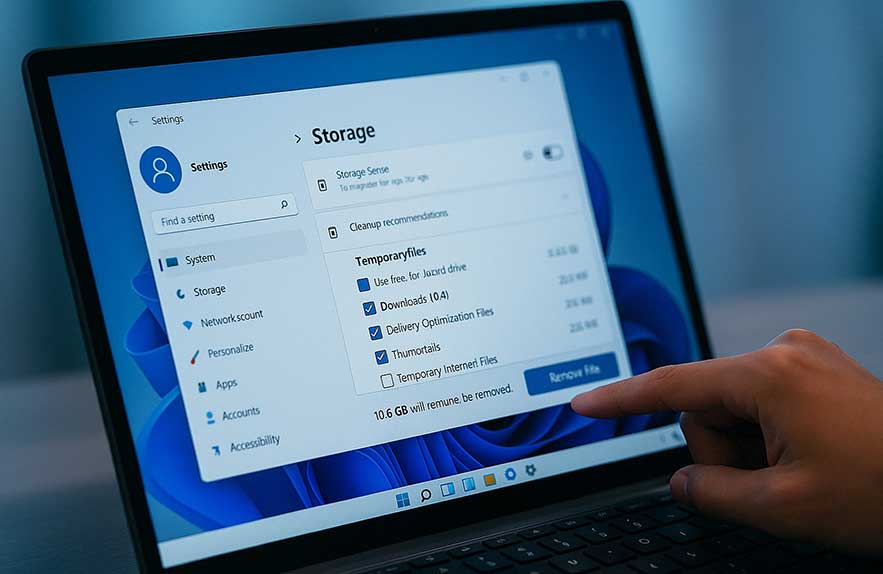
- Go to System > Storage
- Click Temporary files under “Storage management”
- Select the types of temp files you want to remove (Downloads, Recycle Bin, etc.)
- Click Remove files to delete them
This built-in feature not only helps free up space in Windows 11 but also improves performance on devices with limited storage. If you’re managing startup apps as well, check our guide on how to disable startup programs in Windows 11 for additional optimization tips.
Alternatively, for those who prefer the classic approach, you can still use Disk Cleanup:
- Search for Disk Cleanup in the Start Menu
- Select your main drive (usually C:)
- Check boxes for Temporary Internet Files, System Error Memory Dump Files, etc.
- Click OK and then confirm with Delete Files
For official instructions, see Microsoft’s Disk Cleanup guide.
With this step done, you’ve completed a core method to remove app cache in Windows 11. Let’s move on to clearing browser and DNS cache next.
How to Clear DNS and Browser Cache in Windows 11
Another essential step to clear cache in Windows 11 is removing your DNS and browser cache. These types of cache can cause issues like websites not loading correctly, outdated page content, or slow browsing performance. Let’s go over both.
Clear DNS Cache
To clear DNS cache in Windows 11, use the Command Prompt. This clears old IP address records stored on your machine, ensuring smoother internet connectivity and resolving DNS-related browsing issues.
- Press Win + S, type
cmd, then right-click and select Run as administrator - In the terminal, type the following command and hit Enter:
ipconfig /flushdns
After running this, you’ll see a confirmation: “Successfully flushed the DNS Resolver Cache.” This simple command helps resolve network issues and is recommended after changing DNS settings or switching networks.
Clear Browser Cache
Browser cache includes images, scripts, and other website data stored to speed up browsing. However, over time, this can cause problems like broken layouts or outdated pages. Here’s how to clear it in common browsers:
For Microsoft Edge:
- Open Edge, click the three-dot menu (⋯) in the top-right
- Go to Settings > Privacy, search, and services
- Under Clear browsing data, click Choose what to clear
- Select “Cached images and files” and click Clear now
For Google Chrome:
- Open Chrome and press Ctrl + Shift + Delete
- Set time range to All time
- Check the box for Cached images and files
- Click Clear data
Regularly clearing your browser cache can fix loading issues and ensure you see the most updated content. If you’re still experiencing performance drops, review what launches at startup using our Windows Startup Folder Guide.
Want a deeper look into performance tuning? Our guide on how to lower CPU usage in Windows 11 explains how to reduce system load across the board.
How to Clear System Cache in Windows 11
To truly clear cache in Windows 11 and optimize your PC’s performance, it’s important to address the system cache. This includes cached files used by Windows updates, system processes, drivers, and other temporary components that may not be visible in normal cleanup tools.
Use Disk Cleanup Tool
Windows 11 includes the built-in Disk Cleanup utility, which helps remove hidden files and free up space in Windows 11 without risking important data. Here’s how to access and use it:
- Press Win + S and search for Disk Cleanup
- Select your system drive (usually C:) and click OK
- Check boxes for items like Temporary files, System created Windows Error Reporting, and Delivery Optimization Files
- Click OK then Delete Files to confirm
This method can recover several gigabytes of space depending on how long it’s been since your last cleanup. It’s safe and efficient, especially after major updates or heavy system use.
Optional: Remove Update Cache (Advanced)
If you want to go further, you can manually delete the Windows Update cache, which stores downloaded update packages. This can help resolve stuck or failed updates, but should be used with caution.
- Press Win + R, type
services.msc, and hit Enter - Scroll down to Windows Update and click Stop
- Navigate to
C:\Windows\SoftwareDistribution\Download - Delete all files inside the
Downloadfolder - Return to services.msc and Start Windows Update again
This clears out leftover update files and may resolve update errors. If you’re unsure, check Microsoft’s official guide to freeing up drive space.
You can also revisit our tutorial on disabling startup programs in Windows 11 if background processes are still eating up performance after cache cleanup.
How to Remove App Cache in Windows 11
Clearing individual app cache in Windows 11 can resolve crashes, free up space, and improve overall responsiveness. Many installed apps, including Microsoft Store apps, browsers, and third-party tools, store temporary files that build up over time.
Clear Cache from Microsoft Store Apps
Windows provides a built-in tool to reset the cache for Microsoft Store apps. If you’re facing sluggish performance, follow these steps to remove app cache from native Windows apps:
- Press Win + R to open the Run dialog
- Type
wsreset.exeand press Enter - A blank Command Prompt window will open and close automatically
- This clears the Microsoft Store cache without deleting any apps
It’s a simple and effective way to fix issues with app downloads, store responsiveness, and cache bloat from native Windows apps.
Clear Cache in Browsers (Edge, Chrome, Firefox)
Web browsers are among the biggest cache consumers. To truly clear cache in Windows 11, make sure you clean out browser data regularly. Here’s how to do it in Microsoft Edge:
- Open Edge and click the three-dot menu in the top-right corner
- Go to Settings → Privacy, Search, and Services
- Under Clear browsing data, click Choose what to clear
- Select options like Cached images and files, Cookies, and Browsing history
- Click Clear Now
Repeat similar steps for Chrome and Firefox. This process not only improves browser speed but also frees up space in Windows 11 and protects your privacy.
Clear Cache in Third-Party Apps
Some apps like Adobe, Spotify, or Discord also store cached data that can grow large over time. Most of them have built-in options to clear cache in their settings. If not, you can manually delete cached folders by navigating to:
C:\Users\YourUsername\AppData\Local\AppName
Just be careful not to delete configuration files or folders you don’t recognize. Always back up data if unsure. You can read our startup folder guide for more ideas on managing background services that contribute to cache buildup.
For further reference on managing app cache, Microsoft has guidance on app performance and cache handling for Windows environments.
Frequently Asked Questions (FAQ)
Still have questions about how to clear cache in Windows 11? This section answers the most common queries from users who want to free up space, boost speed, or fix buggy apps. If you’re unsure where to start, these quick answers will help.
1. What’s the difference between temporary files and system cache?
Temporary files are created by apps and the system during use (e.g., installers, update leftovers, thumbnails). System cache includes data stored by Windows to speed up processes like app launches and search indexing. Both can take up space and are safe to delete using tools like Disk Cleanup or Storage Sense.
2. Does clearing the cache delete my files or settings?
No. Clearing cache only removes temporary data. It won’t delete personal files, documents, or settings unless you’re explicitly removing saved sessions or preferences in an app. When you remove app cache in Windows 11, it may log you out of the app, but not erase your content.
3. How often should I clear cache on Windows 11?
It depends on your usage. If your device starts slowing down or you’re running low on storage, it’s a good time to clear cache. For most users, doing it once a month using built-in tools like Storage Sense or Disk Cleanup is sufficient.
4. Can I automate cache clearing in Windows 11?
Yes. You can turn on Storage Sense to automatically delete temporary files, old downloads, and empty Recycle Bin entries:
- Go to Settings > System > Storage
- Click on Storage Sense and toggle it on
- Customize when and how Windows cleans up files
This is the easiest way to keep things tidy without manual cleanup.
5. What’s the best way to clear DNS cache?
To clear DNS cache in Windows 11, use the Command Prompt:
ipconfig /flushdnsThis will refresh your system’s DNS resolver and can help fix network or website loading issues. It’s especially useful after changing your DNS settings or experiencing browser problems.
6. Will clearing cache help speed up my PC?
Yes — in many cases, it can. Cached data from apps and browsers can build up quickly, slowing down disk access and cluttering storage. By learning how to lower CPU usage and clear junk files, you’ll improve system responsiveness.
7. Is there a safe all-in-one tool to clear everything?
If you want a one-click option, Storage Sense is the safest native tool. Third-party tools like CCleaner exist but should be used with caution, as they can delete sensitive files or registry entries. Stick with built-in Windows features for safety.
8. Can I undo cache clearing?
No — once cleared, cache data is permanently deleted. However, Windows will rebuild necessary cache files automatically as you use apps and the system. There’s usually no downside to clearing them regularly.
For a complete guide on startup optimization and system performance, check out our article on the best ways to manage startup apps.
That wraps up our cache clearing guide! Let us know if you want tutorials on deeper system cleanups, performance boosts, or registry tuning in future posts.