Why Knowing Your PC’s Specs Is Important
Learning how to check pc specs is the first step in becoming more confident with your technology. You might think specs are only for tech experts or gamers, but the truth is that everyone benefits from knowing what is inside their computer. Whether you are planning to upgrade, solve a problem, or install new software, the details about your PC’s processor, memory, graphics, and storage matter much more than you might expect.
For people who enjoy gaming, understanding your hardware is absolutely essential. Today’s top games have higher requirements than ever before, and not every PC is ready for the newest titles out of the box. Checking your specs lets you know if your system meets the windows 11 system requirements or if you need an upgrade for better performance. Even small details like the amount of RAM or the type of graphics chip can make a night-and-day difference between smooth gameplay and constant lag or crashes.
Upgrades are another big reason to learn how to check pc specs. If your computer feels slow, it might be due to outdated hardware, insufficient memory, or a storage device that cannot keep up. Checking what is installed right now makes it much easier to plan your next move. For example, you will be able to tell if you have an upgrade slot available for extra RAM or if your system can handle a newer, faster SSD. This same approach helps you avoid wasting money on parts that will not fit or give you real benefits.
Troubleshooting is another area where specs become more important than people realize. If your PC keeps crashing during video calls or refuses to open demanding apps, checking your hardware specs can point you straight to the bottleneck. It is not always about viruses or broken software sometimes, the hardware is simply outmatched or needs a quick upgrade. Knowing how to check pc specs saves time when talking to technical support or searching for fixes online, since you can provide exact details about your processor speed, amount of RAM, and graphics type right away.
Compatibility checks for new software are easier too once you know your PC’s specs. Before installing new creative tools or trying out the latest features in Windows 11, a quick specs review keeps you from running into frustrating errors or failed installations. Many software tools and even Windows 11 itself have minimum specs. Knowing your current setup helps you determine if you need to upgrade or if you are already ready for new features.
Overall, taking a little time to learn how to check pc specs puts you in control and makes you a smarter technology user. It helps you avoid headaches, save money, and get the most out of your computer no matter if you are troubleshooting, gaming, or just staying current with updates and requirements. Up next, we will look at the easiest way to view your core specs using the Windows Settings app a simple start for anyone wanting to get familiar with their computer’s hardware.
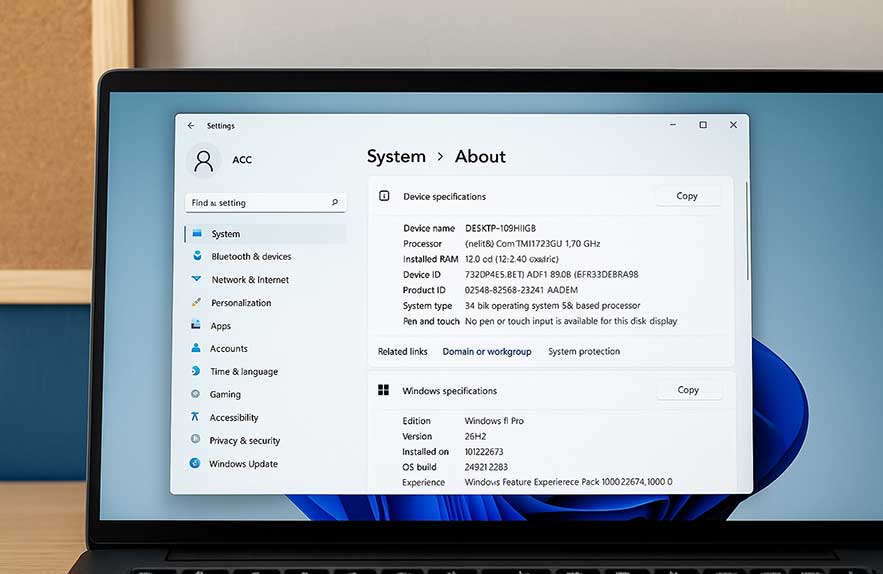
Using the Windows Settings App to View Basic Specs
For anyone new to computers, learning how to check specs on Windows 11 is one of the easiest and most direct ways to discover your system’s basic capabilities. Windows 11 was designed with beginners in mind. Microsoft included a streamlined Settings app that brings hardware details and system information together in a single place. If you have ever typed “how to check specs on Windows 11” or wondered what processor, RAM, or build you are actually running, this method gets you reliable answers with just a few clicks.
Start by opening the Settings app. You can do this by clicking the Start menu and choosing the gear-shaped Settings icon, or by pressing
In the About section, you will see two key areas: Device specifications and Windows specifications. Under Device specifications, you can check details like your processor type and speed, installed RAM, device ID, and system type (such as 64-bit operating system). This information is what most users look for first when researching how to check specs on Windows 11, since it tells you in plain language how powerful and up-to-date your hardware is.
The Windows specifications section lists your current version and build of Windows 11, which is helpful for confirming you can run new features or meet certain windows 11 system requirements for software. Having this info handy also makes it much easier to speak with tech support or friends when asking about compatibility or performance problems.
For routine upgrades or troubleshooting, the Settings app is the go-to answer for how to check specs on Windows 11. Many users find it helpful to take a screenshot or write down the details when comparing their PC to recommended specs for games, new apps, or potential hardware upgrades. Since this method requires no extra downloads or technical know-how, it works well for family, coworkers, and anyone less experienced with PCs. Whenever you see guides that walk you through how to check pc specs, this Settings app approach is almost always listed as the easiest first step.
If you would like a visual step-by-step, Windows Central’s guide to checking specs on Windows 11 includes screenshots and makes every step clear for all users. In our next section, we will move beyond the basics and see how power users dig deeper with the System Information tool to find even more details about their computers.
Using System Information Tool for Detailed Specs
When you want to dive deeper than the basics, learning how to see computer specs windows 11 with the System Information tool is your next step. This built-in feature gives a much more thorough look at your computer’s hardware and software than the simple summary in Settings. If you need to troubleshoot a tricky problem, check for compatibility before upgrading a component, or just satisfy your curiosity, opening System Information (also known as msinfo32) reveals a goldmine of technical details.
To get started, open the Start menu and type
msinfo32In System Summary, you can see exact details about your processor model and speed, total RAM, exact motherboard model, BIOS version, and even information about boot settings or virtualization support. This is why how to see computer specs windows 11 with System Information is so valuable for users upgrading or planning serious troubleshooting it offers details often left out of beginner guides.
If you are replacing or adding components, knowing your motherboard model is crucial for finding compatible parts. System Information also lets you check how much memory your computer recognizes and whether your device supports technologies like secure boot, virtualization, or advanced power management. Whether you are checking specs for a work upgrade, planning to install more RAM, or preparing your computer for a major update, these specs answer the questions that pop up along the way.
Another benefit of this method is the ability to export your results. If you need to share your specs with a friend, tech support, or a forum, simply click File and then Export in the System Information tool. This creates a text file listing all your current specs for easy reference or troubleshooting. As you keep learning how to see computer specs windows 11 style, you will find yourself using this export often for maintenance, upgrade projects, or support tickets.
If you are looking for hands-on screenshots and step-by-step visuals, How-To Geek’s in-depth guide on checking computer specs in Windows 11 makes the process even more beginner-friendly. Next, we will explore using Task Manager as a simple but powerful way to check live performance and identify bottlenecks in your system’s main components.
Checking Hardware Specs via Task Manager
Task Manager is one of the easiest and fastest ways to check pc specs while also seeing how your hardware is performing in real time. Many people know Task Manager as the tool to close frozen apps, but it is also a powerful resource for monitoring the details and usage stats of your CPU, memory, disks, and graphics. If you want to know what is running inside your computer right now or learn if a slowdown is due to overloaded hardware Task Manager is the tool you should open.
To check pc specs with Task Manager, right-click the taskbar and select “Task Manager,” or simply press
Ctrl + Shift + EscThe “CPU” section shows your current processor speed, the number of cores in use, and how busy your CPU is at the moment, shown as a percentage. The “Memory” section lists both the amount of RAM installed and how much is currently being used. Under “Disk,” you can see your storage devices listed by name and type (SSD or HDD), along with their active rates. The “GPU” section provides model names and live usage graphs for your graphics card, handy for gamers or anyone who edits video or photos.
This method is great for more than quick checks. Pulsing graphs let you literally see how your PC specs handle workloads in real time. Open your favorite program and watch which component spikes in usage. If your RAM is pinned at 90% or higher, you know an upgrade might be needed. If the CPU graph goes up and stays high while gaming, your processor may be the main bottleneck. You can also keep Task Manager open during long tasks to spot overheating, sudden slowdowns, or background apps using lots of resources unexpectedly.
Another benefit of using Task Manager to check pc specs is that you don’t need any extra software or technical knowledge. All the major information is just a few clicks away. For troubleshooting, planning upgrades, or simply satisfying curiosity about what’s happening inside your machine, Task Manager provides both detail and context. It is a tool worth revisiting regularly not just when something goes wrong.
Up next, we’ll explore advanced ways to check and list every detail about your specs, using command-line tools like Command Prompt and PowerShell. This step is for anyone who wants to dig even deeper and see every bit of data behind their PC’s performance.
Using Command Prompt or PowerShell for Advanced Specs
If you like to dive a little deeper into your computer’s data, using Command Prompt or PowerShell offers a powerful method for discovering every detail behind your system. There are no menus to click just a few quick commands. For users who want extensive lists of information, logging all your system specs in a file, or just love geekier ways to check pc specs, this approach is unbeatable. It also works across all editions of Windows 11, which makes it perfect for advanced troubleshooting or remote support.
Start by opening Command Prompt. Press
Windows key + Sand type “cmd” into the search box, then select “Command Prompt” from the results. In the command window, type:
systeminfoand press Enter. After a few seconds, you will see a full breakdown of your computer’s operating system version, processor, installed memory, BIOS, and more. This built-in tool is a great answer to how to check pc specs or even how to check specs on windows 11 when you want a detailed inventory without clicking through menus.
For even more details, PowerShell provides another useful command. Open PowerShell by searching for it in the Start menu. Then type:
Get-ComputerInfoThis command provides a very detailed report on everything from hardware to installed Windows features. You can scroll back through the data or save it as a text file for future reference. Power users love this because it allows quick reporting and troubleshooting, and ensures you know exactly what parts or drivers you have before ordering upgrades.
These command-line options work well when a system is having trouble displaying graphics or the Settings app will not open. People who ask how to see computer specs windows 11 in tough situations can always rely on these tools, even if they need to help someone by phone or chat. Systeminfo and Get-ComputerInfo are also great for remote work, as you can log in from anywhere and run a quick spec check with just a few commands.
The great thing about checking specs with Command Prompt or PowerShell is that it works regardless of user interface changes, theme settings, or driver issues. It also means you can copy every detail, from CPU model to installed RAM, straight into a support ticket or forum post for clear, fast answers. The next section will close out by recommending the right tool for each user level and remind you that having these skills keeps your system running smarter, longer.
Final Tips: Choosing Tools Based on Your Needs
Knowing how to check pc specs gives you the power to take control of your computer experience. Whether you are a first-time user or a seasoned PC builder, a quick specs check should be a normal part of troubleshooting, upgrading, or even deciding if you are ready for the next version of Windows. With so many options available, it is important to choose the tool that makes your life easier, not more complicated.
For most beginners, the built-in Settings app in Windows 11 is the perfect starting point. It is quick and easy to find, requires no extra software, and offers an instant overview of your hardware, Windows edition, and system type. If you are just beginning to learn how to check specs on windows 11, this method works well for basic upgrades or verifying that your system meets windows 11 system requirements for new games or software.
Users who want more detail without digging into advanced commands should try the System Information tool. Learning how to see computer specs windows 11 style with msinfo32 unlocks far more data everything from BIOS versions to exact RAM slots. This is helpful when you want to buy compatible hardware, solve persistent problems, or provide information to tech support in a detailed way. It is a great step for intermediate users ready to go beyond basics but who still want a clear, organized window.
Task Manager is ideal for anyone who wants to check pc specs while monitoring live performance. Students, gamers, and remote workers can catch overheating, see bottlenecks, or plan upgrades by watching their RAM and CPU usage in real time. It is a practical tool for spotting problems or just understanding what is happening when your PC slows down for no obvious reason.
Advanced users and those who love command-line control will feel right at home running systeminfo in Command Prompt or Get-ComputerInfo in PowerShell. This is the most detailed approach, showing every system detail and making it easy to copy specs for consulting, documentation, or troubleshooting across many devices. There is no user interface to get in the way and no need for any extra downloads. Anyone working in tech support, planning a major upgrade, or building custom computers should know this process inside and out.
No matter your skill level, being able to check pc specs means you make smarter decisions for upgrades, new software, or getting help. You are no longer guessing or feeling lost when faced with compatibility checks, Windows 11 system requirements, or mysterious slowdowns. Instead, you stay in control, save time, and are less likely to spend money on parts that might not fit or perform as expected. Keep these methods handy, and any time you are troubleshooting or setting up a new machine, you will know exactly how to check pc specs and get the most from your Windows 11 computer.